

Salesforce is a platform that manages relationships with customers, one of the most powerful CRM in the market, if you use this tool and want to communicate with your contacts, we have the best combination for you.
The integration of 360nrs with Salesforce allows you to send and receive SMS easily from Salesforce using the best features of it.
For this integration to work properly it is necessary to bear in mind the following previous considerations:
You must have a {{NAME}} account and sufficient credit.
Mobile phones must always contain the international prefix. Otherwise, the messages can not be delivered correctly.
The senders can be numeric or alphanumeric. For numeric senders, the maximum length is 15 characters and for alphanumerics 11 characters.
A standard SMS allows a maximum of 160 characters using the GSM7 codification. Characters not supported by the GSM7 codification will be automatically substituted for the most similar character in GSM7. For example: "á" is not supported by GSM7, so the system will change it for an "a", which is the character supported by GSM7. You can find all GSM7 characters allowed in the annex.
Some characters included in the GSM7 count as 2 characters. You can find the extended characters in the annex.
If the length of SMS is greater than the maximum, the system will concatenate the necessary SMS up to a maximum of 5 SMS. (the end user sees it as if it was a single SMS).
The certified SMS have an additional cost.
To integrate {{NAME}} with Salesforce Marketing Cloud it is necessary to connect {{NAME}} to Salesforce Marketing Cloud.
To do this, go to your Salesforce Marketing Cloud account to the {{NAME}} SMS menu within AppExchange 
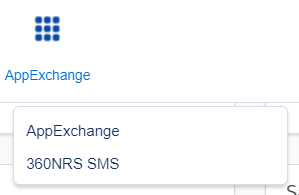
Illustration 1 - AppExchange
There the following screen will appear:
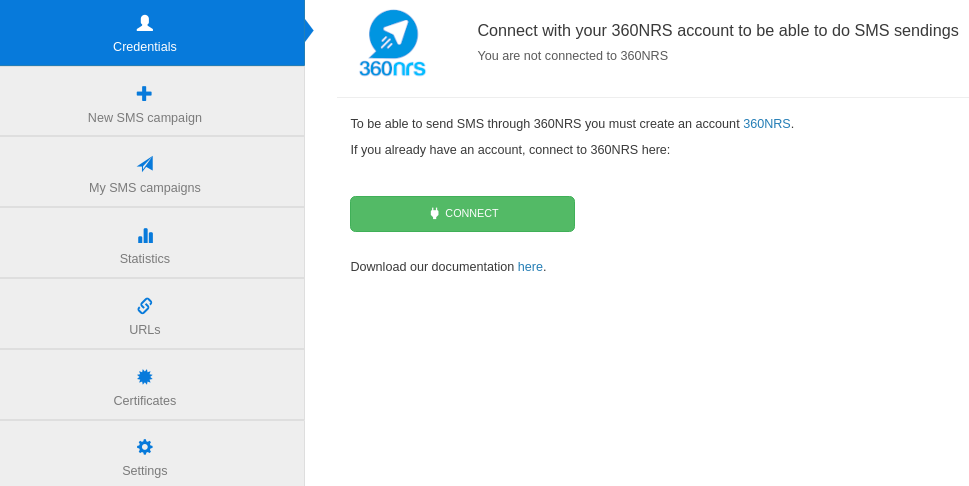
Illustration 2 - Connect
By pressing the CONNECT button
 you will be redirected to the Login screen, where you must enter your {{NAME}} credentials.
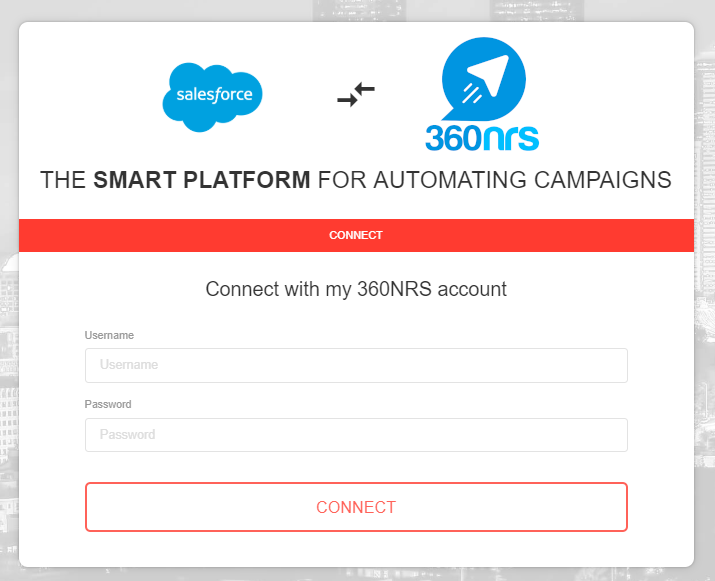
Illustration 3 - Credentials
By entering the credentials you will be redirected back to the initial screen where, if everything went well, your account will now appear as connected.
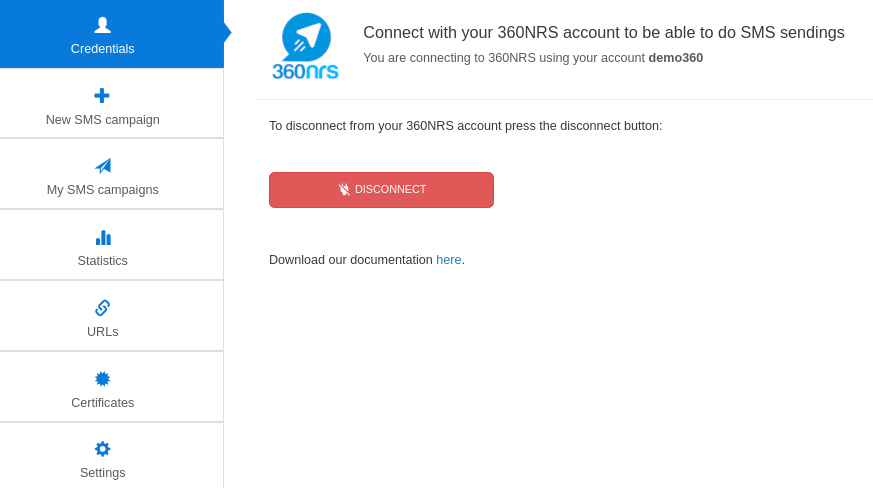
Illustration 4 - Connected
At any time, you can add an SMS sending action through {{NAME}}.
To do so, you must click on the Send SMS button displayed in the Activities section.
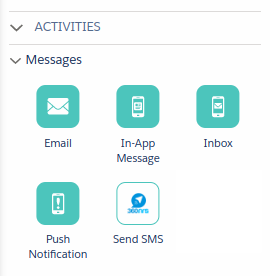
Illustration 5 - Send SMS
To add the activity to the journey you must drag and drop, but first you must set-up an Entry source, otherwise the system will not allow you create your message.
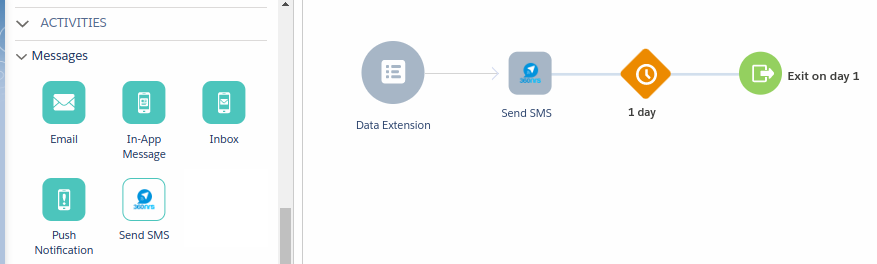
Illustration 6 - Entry source
After clicking on Send SMS, a pop-up menu will appear, where you can enter the details of your message.
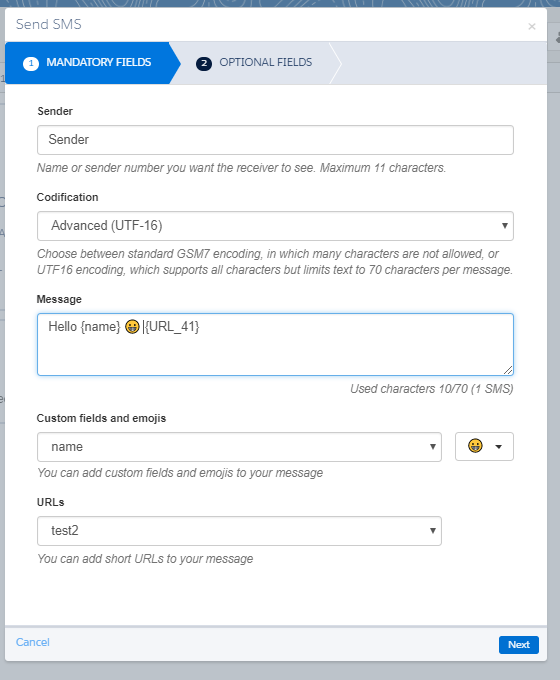
Illustration 7 - Mandatory fields
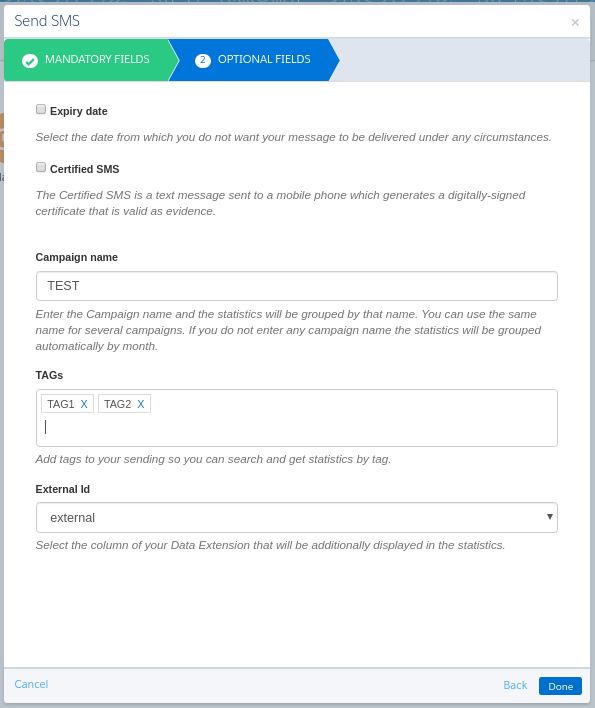
Illustration 8 - Optional fields
Here you can enter the following data:
| Field | Description |
|---|---|
| Sender | Sender's text, this label can contain up to 15 numbers or 11 alphanumeric characters. |
| Codification | The possible values are gsm and utf-16. The gsm value for normal sendings with GSM7 coding and 160 characters per message, and the value utf-16 for UCS2 coding (UTF16) and 70 characters per message. If not specified, the default value is gsm. |
| Message | Message text. Here you can add Custom Variables according to the selected input source; these variables are replaced by the corresponding values of the input source. You can also add emojis, the latter available only for UTF-16 codification. |
| URLs | Custom urls, for more information see URLs section. |
| Expiry date | Date from which the message is no longer sent. |
| Certified SMS | If this parameter it's specified as true, the message will be sent as a certified SMS.* Certified messages have additional cost. |
| Campaign Name | If specified, the statistics will be grouped with that name. If not specified, the statistics will be grouped automatically by month. |
| Tags | Add TAGs and they will be displayed in the TAGs column of the statistics. |
| External ID | Select a column from the Data extension and that information will be displayed in the External ID column of the statistics. |
Once your message is ready, press the Done button located below and the Send SMS action will be integrated into the Journey; after doing that, the activity box will be green.
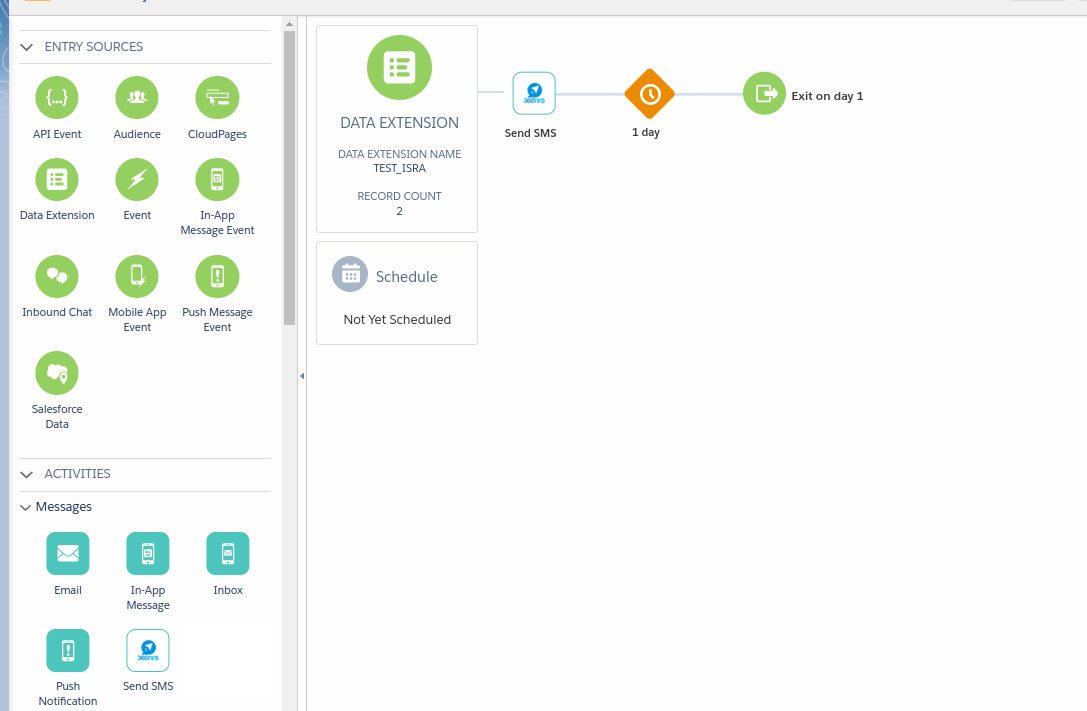
Illustration 9 - Execute Journey
Once the Journey is executed and reaches that action, the SMS will be sent.
In this section you will be able to send or program a SMS campaign using the data of any of your Data Extension.
The assistant has four steps, in the first step the origin of the data is chosen, in the second one the SMS is set up, in the third one the optional parameters are set up and in the fourth one a preview is shown.
In this step the you introduce the External Key of the Data Extension where you have the data to make the campaign.
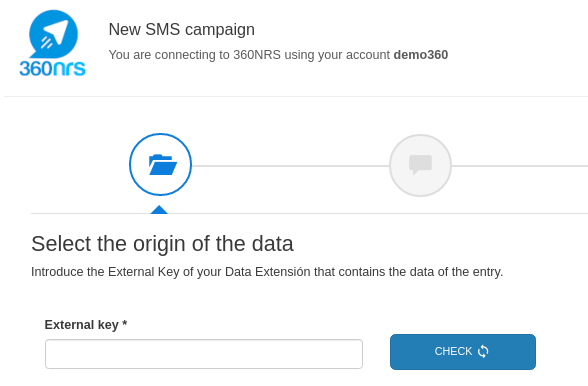
Illustration 10 - Origin of the data
Here you can introduce:
| Field | Description |
|---|---|
| External Key | It is the unique ID from your Data Extension. |
Once the External Key has been introduced, you should push the button CHECK. If everything is correct, a preview of 3 elements will appear showing the information obtained in that Data Extension.

Illustration 11 - Data extension preview
After that you should choose the country to which you want to make the sending, in this column of the Data Extension the telephone number is and optionally in which column the Data Extension the External ID is.

Illustration 12 - Country, Phone and External ID
Here you can choose the following data:
| Field | Description |
|---|---|
| Country | The country where the SMS will be sent. |
| Telephone | It is the column of the Data Extension where the telephone number is. The telephone number should be numeric, without spaces, and can have or not international prefix. |
| External ID | Choose one column of the Data Extension and this information will be shown in the column External ID of the statistics and notifications. |
In this step you set up the sender, encoding and the text of the SMS.
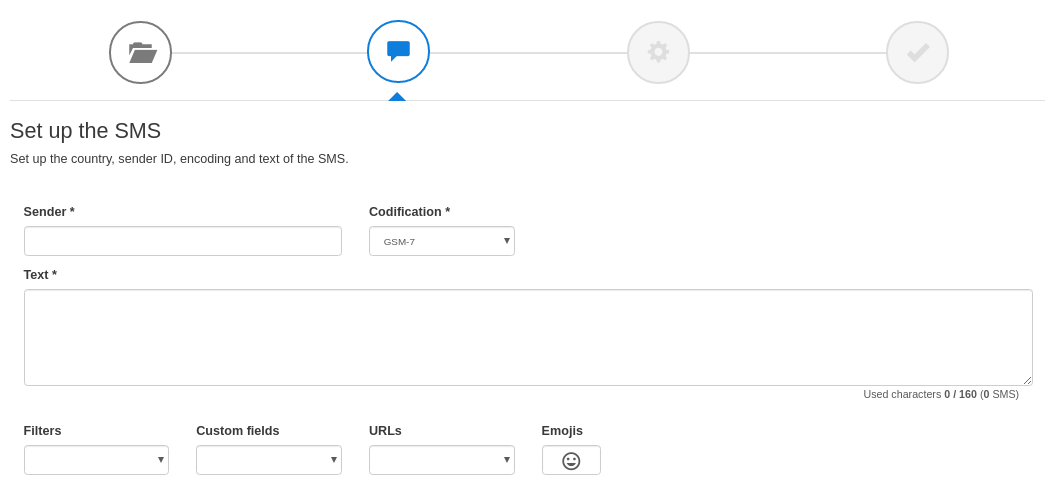
Illustration 13 - Set up the SMS
Here you can introduce the following data:
| Field | Description |
|---|---|
| Sender | Text of the sender. This parameter can contain until 15 digits or 11 alphanumeric characters. |
| Encoding | The possible values are GSM-7 and UTF-16. The value GSM-7 for sendings with normal GSM-7 encoding and 160 characters each message and the value UTF-16 for UCS2 (UTF-16) encoding and 70 characters per message. |
| Text | Text of the message. It is possible to add Customized files, URLs and Emojis. |
| Filters | Before adding a Customized field it it possible to choose a filter so that this customized file is shown:lower: in lowercase.upper: in capital letters.capitalize: the first letter of the first word in capital letters.capitalizeAll: The first letter of each word in capital letters.formatDotComma: thousands separator with dot and decimals separator with comma.formatCommaDot: thousands separator with comma and decimals separator with dot.shorten: returns a shortened url. It must be a valid url. |
| Custom fields | The name of the columns found in your Data Extension will be shown. When the SMS is sent it will be replaced with the information on this column. |
| URLs | If you add the URLs in the section URLs these ones will be shown in the selector. When the SMS is sent the system will automatically replace that URL with a short URL so that it uses less space in the SMS. |
| Emojis | It is possible to add emojis in the text of the SMS. The emojis are special characters, therefore they are not supported in GSM-7. When adding an emoji, the system will ask you to change the encoding to UTF-16 so that it can be shown correctly. |
If when you are writing a SMS you introduce any character that is not supported with the encoding you are using, a confirmation message where you will be able to change the encoding or keep the current one will be shown.
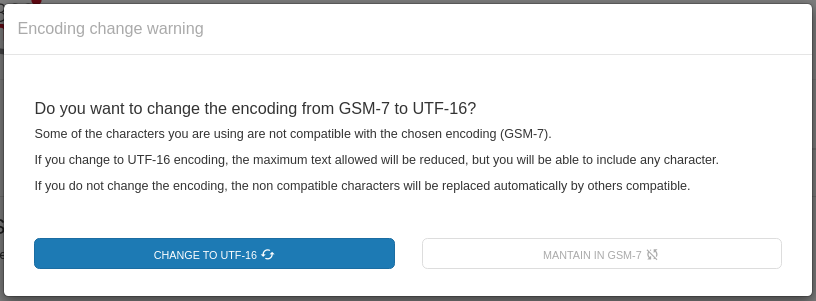
Illustration 14 - Encoding message
In this step you are able to set optional parameters like Campaign name, certificate or not, programming date, expiry date, time zone and tags.
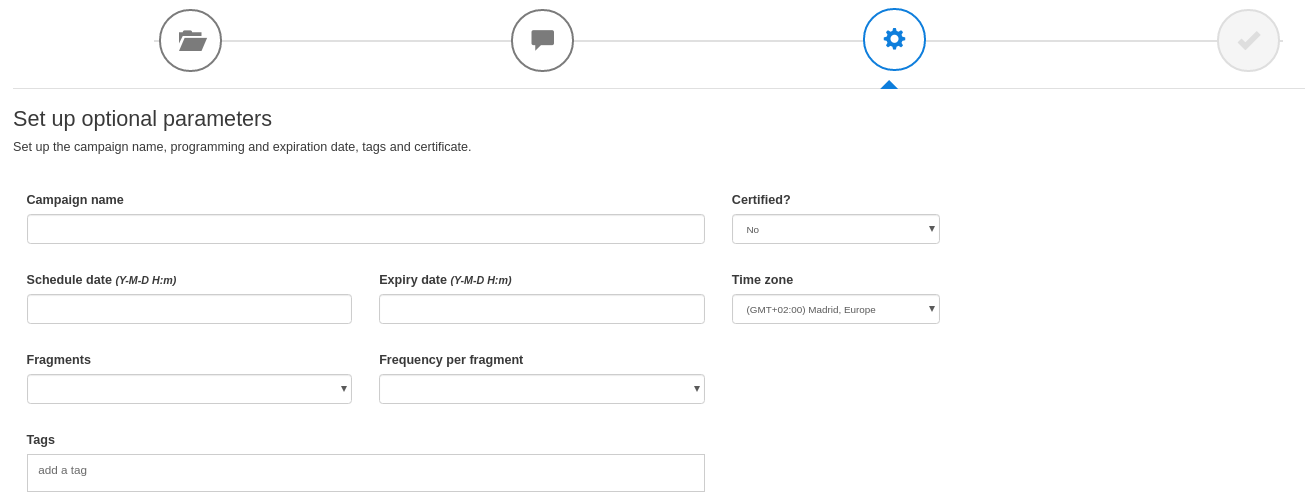
Illustration 15 - Set up optional parameters
Here you can introduce the following data:
| Field | Description |
|---|---|
| Campaign name | Name of the campaign. If it is not specified it will appear like the following example: Marketing Cloud Campaign 2020-07-09 10:17:39 |
| Certificate | Indicates if the SMS will be sent as certified or not.* Certified messages have additional cost. |
| Programming date | Date when the SMS will be sent. |
| Expiry date | Date from which no other SMS will be sent. |
| Time zone | Time zone of the programming date and expiry date. |
| Fragmentation | Add the fragments in which you want to split the sending and the sending frequency for each fragment. |
| Tags | Add TAGs and they will be shown in the column TAGs of the statistics and in your Data Extension. |
In the preview you will be able to check all the details of the campaign. If any of these data are not correct, go to the previous steps and correct it.
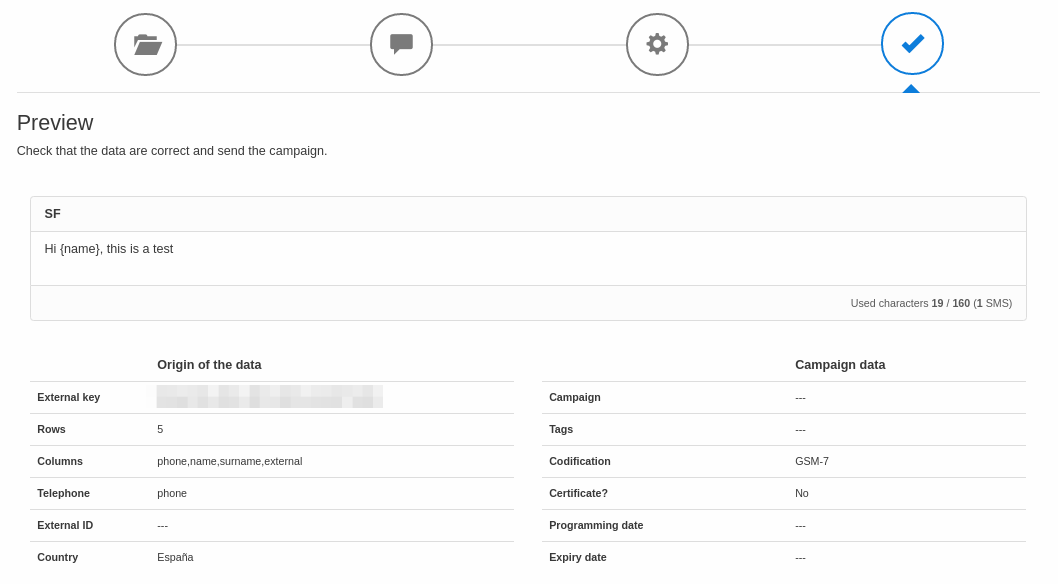
Illustration 16 - Preview
When the details are correct, press the button SEND NOW or SCHEDULE CAMPAIGN. Depending if the campaign has a scheduled date or not one or the other button will be shown.

Illustration 17 - Send now button

Illustration 18 - Schedule campaign button
When pressing the button a message will be shown confirming that the campaign has been correctly processed.
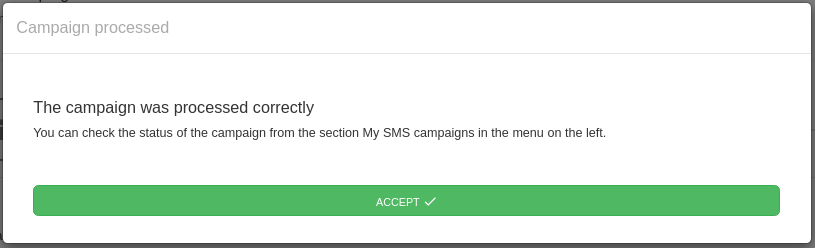
Illustration 19 - Campaign processed message
In this section you will be able to see a list of the campaigns sent from the assistant My new SMS campaign.
In the list you will be able to see the status of the campaign. The possible actions depends on the status.
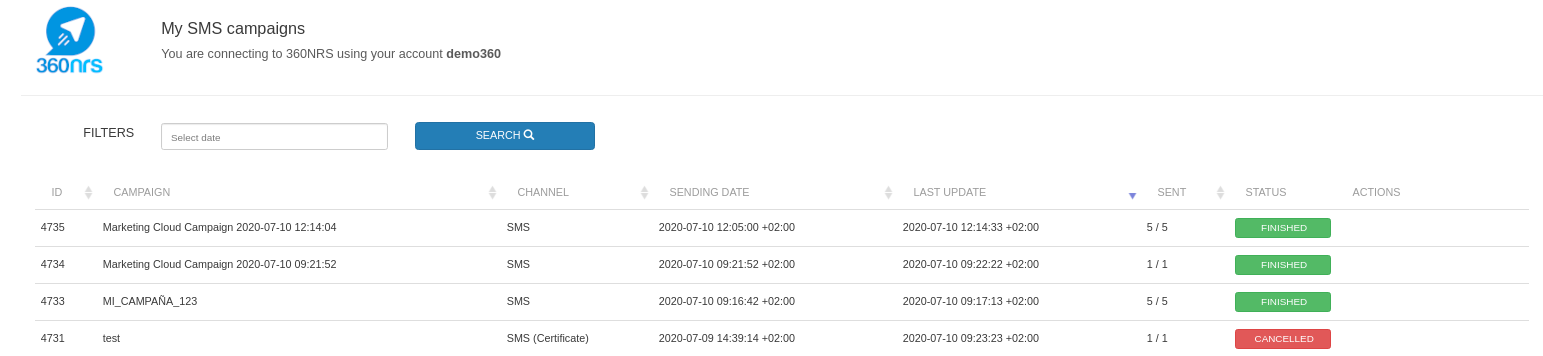
Illustration 20 - My SMS campaigns
It is possible to filter between different dates:
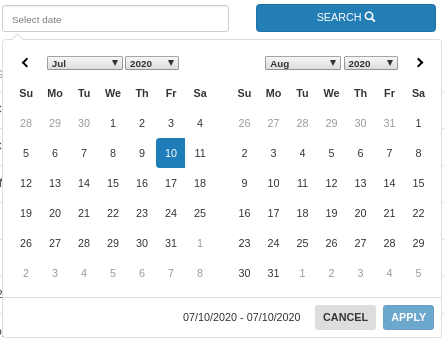
Illustration 21 - My SMS campaigns filter
Depending on the status, a campaign can be paused, restarted, cancelled and duplicated. Independently of the status you will be able to see a preview of the campaign.
Pause campaign
When the campaign is in SENDING status you can pause it.

Illustration 22 - Pause campaign button
When pressing the button PAUSE a confirmation message will be shown:
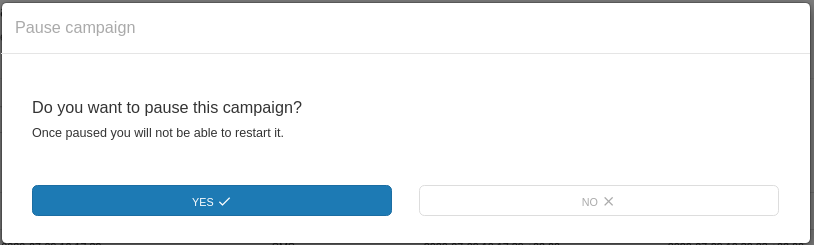
Illustration 23 - Pause campaign message
Restart campaign
When a campaign is in PAUSED status you can restart it. The campaign will continue from there it was stopped when it was paused.

Illustration 24 - Restart campaign button
When pressing the button RESTART a confirmation message will be shown:
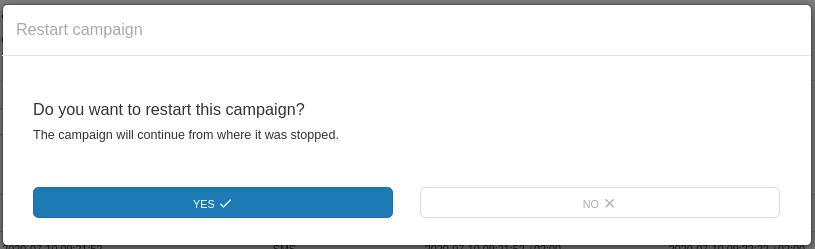
Illustration 25 - Restart campaign message
Cancel campaign
When a campaign is cancelled you are not able to restart it.

Illustration 26 - Cancel campaign button
When pressing the button CANCEL a confirmation message will be shown:
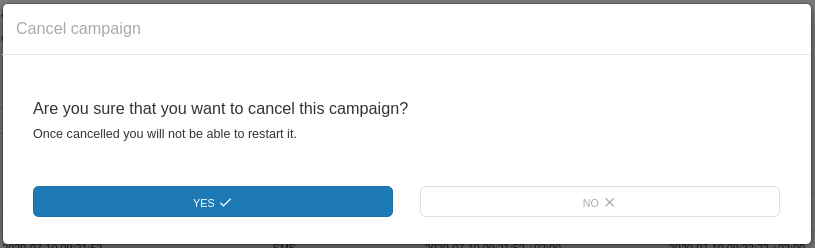
Illustration 27 - Cancel campaign message
Duplicate campaign
When pressing the button DUPLICATE the wizard with the filled data of that campaign will be shown. The result will be a different campaign.

Illustration 28 - Duplicate campaign button
Preview
When pressing the button PREVIEW a window with all the data of the campaign will be shown.

Illustration 29 - Preview button
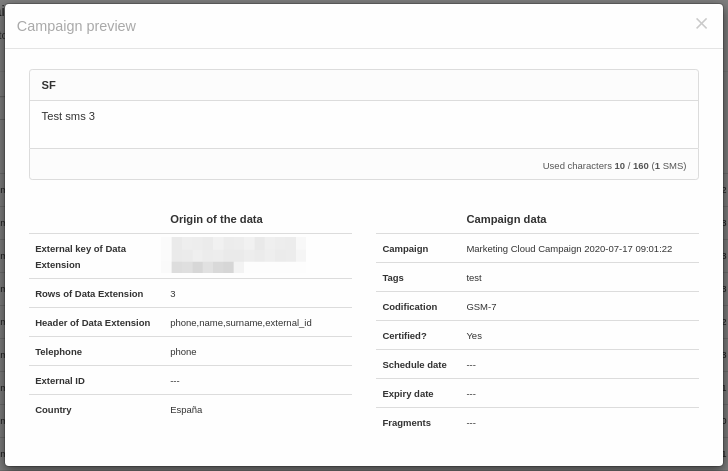
Illustration 30 - Preview
Whenever you want, you can add URLs to be inserted in your SMS sendings through {{NAME}}; in order to do this, go to the {{NAME}} SMS menu within AppExchange and go to the URLs section.
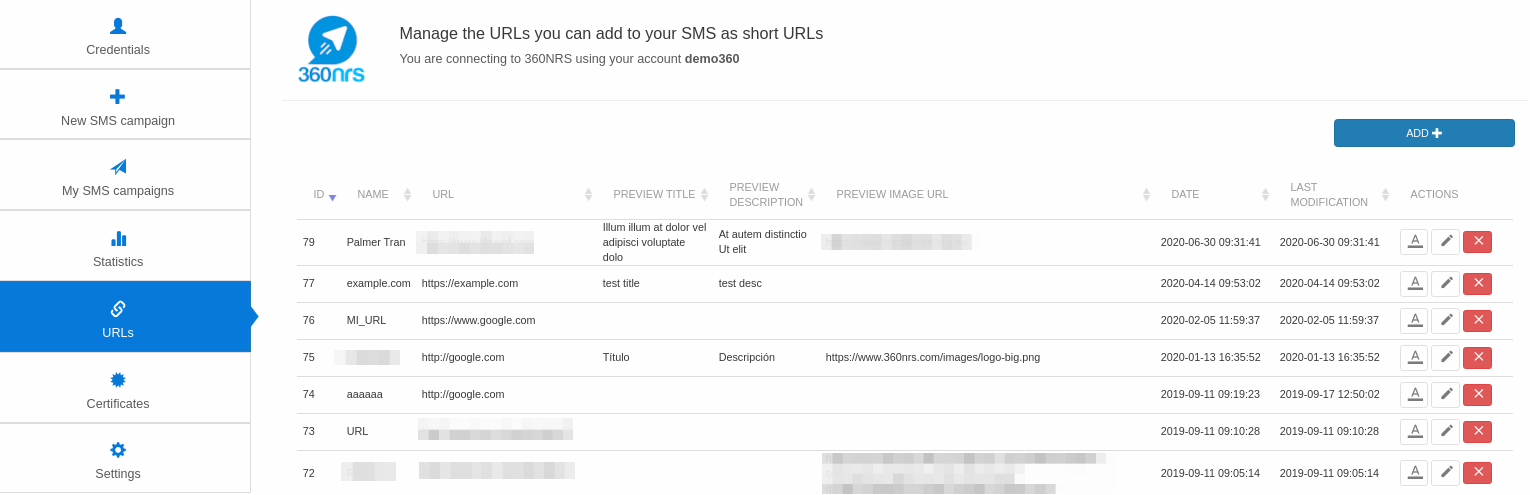
Illustration 31 - URLs
The URLs added here will also appear in the Send Sms activity inside the Journey Builder.
To check the complete statistics on any campaign made through {{NAME}} you must go to the {{NAME}} SMS menu within AppExchange and go the Statistics section.
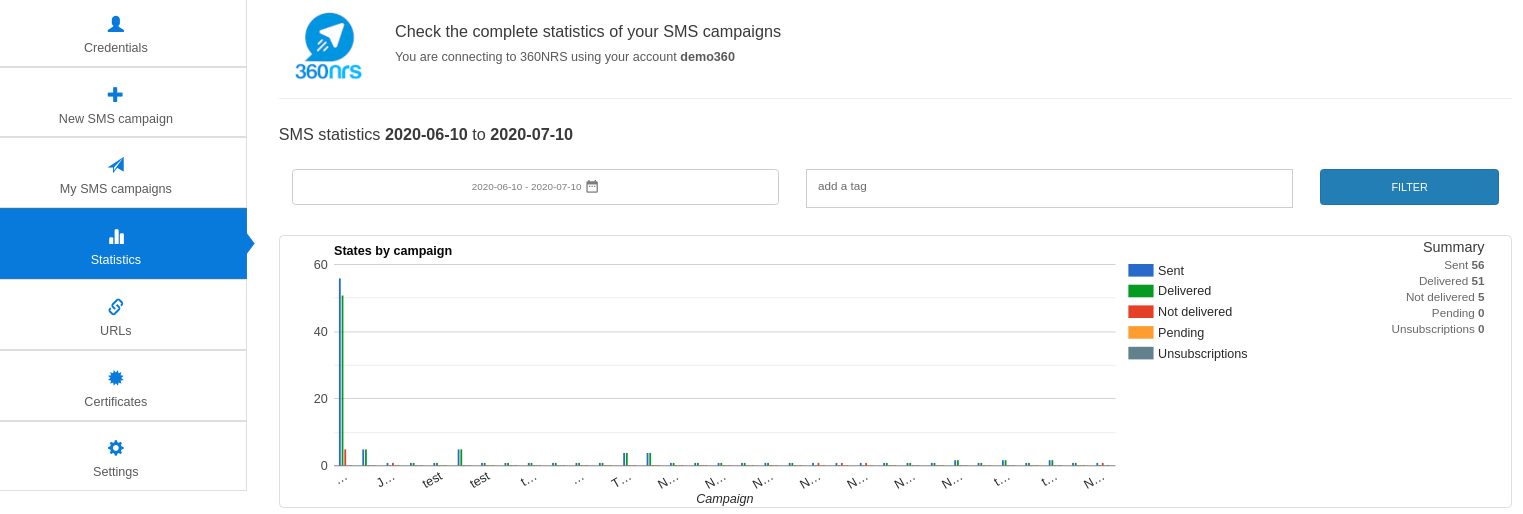
Illustration 32 - Statistics
All the sendings made through Marketing Cloud's Journey are grouped as follows:
MARKETING_CLOUD_SMS_YEAR_MONTH
For example: MARKETING_CLOUD_SMS_2021_01
There you can find the complete statistics by channel (SMS) and download the information in CSV and PDF:
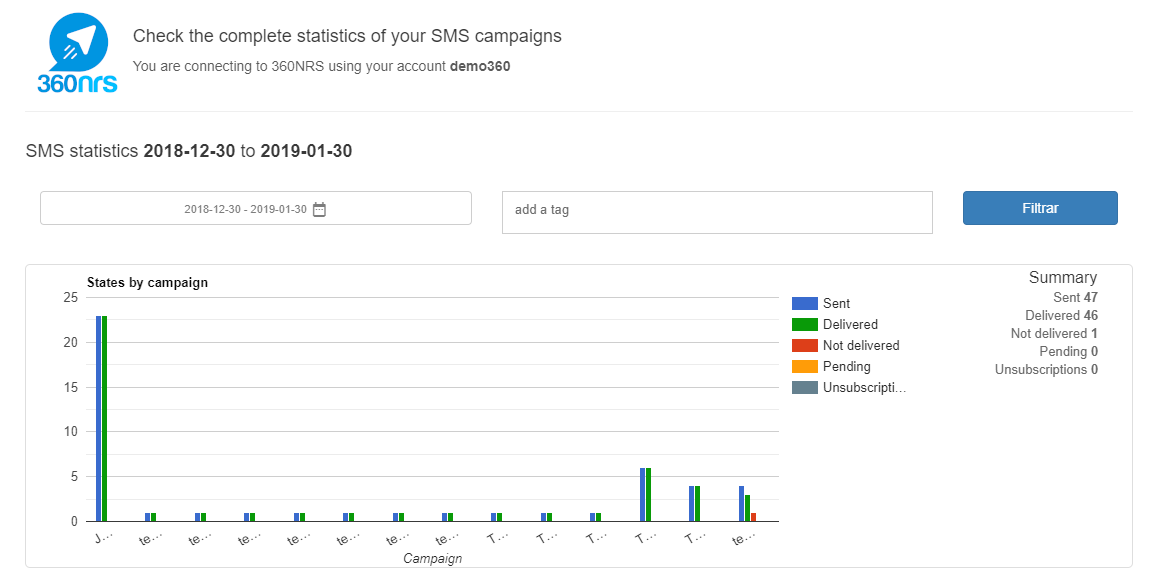
Illustration 33 - Channel statistics
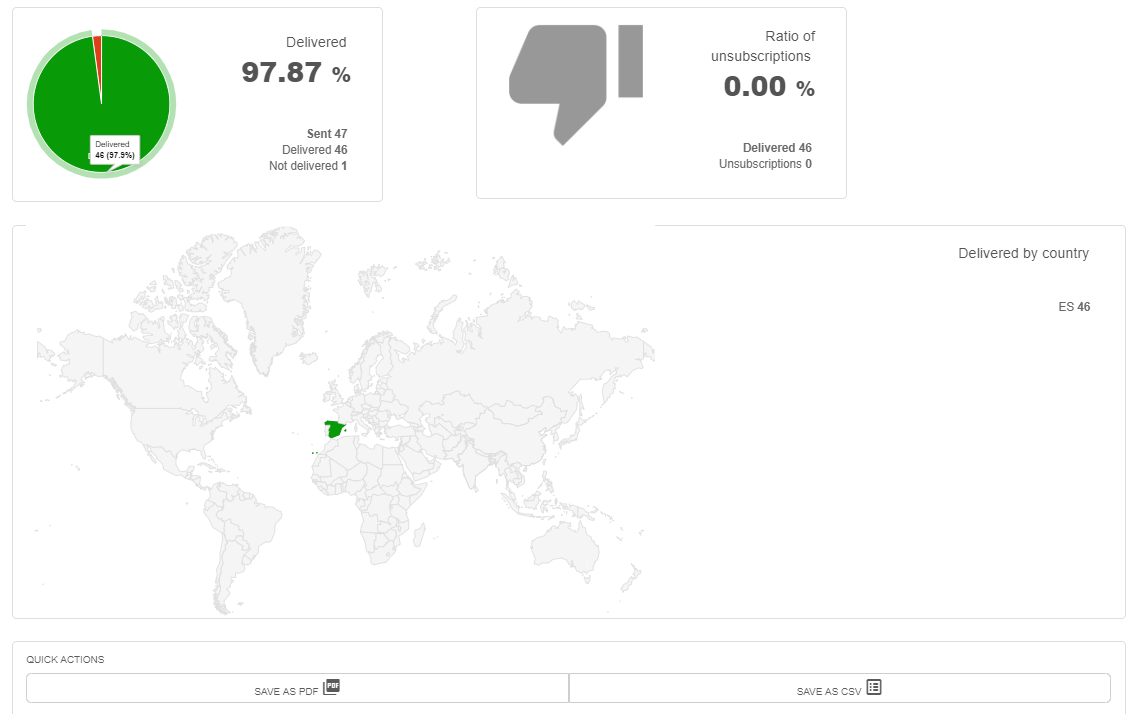
Illustration 34 - Channel statistics
By clicking on the campaign you can see even more details per campaign:
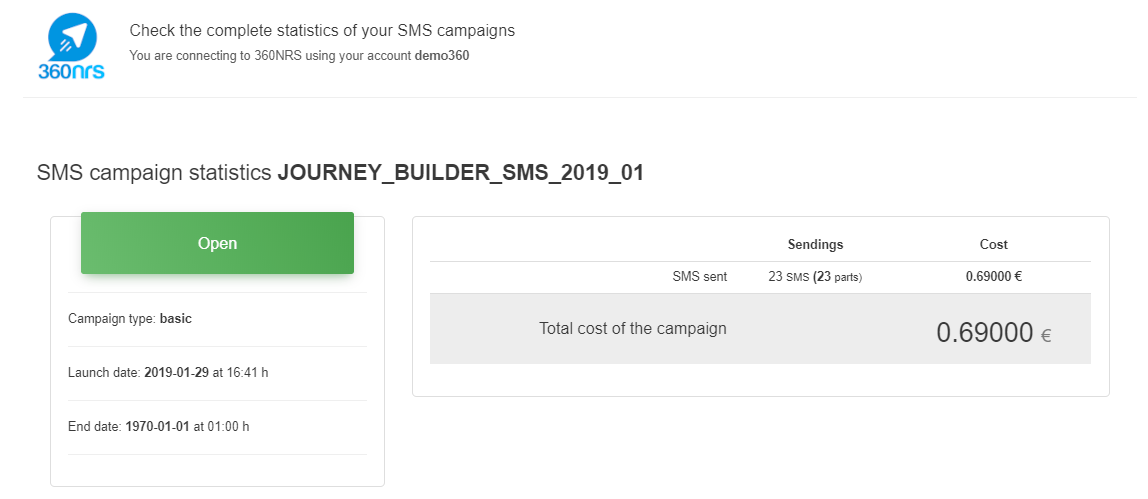
Illustration 35 - Campaign statistics

Illustration 36 - Campaign statistics

Illustration 37 - Campaign statistics
And by clicking on the sending you will be able to see even more details (in addition to the statistics, graphs, map, etc., you will be able to see all the events by contact):
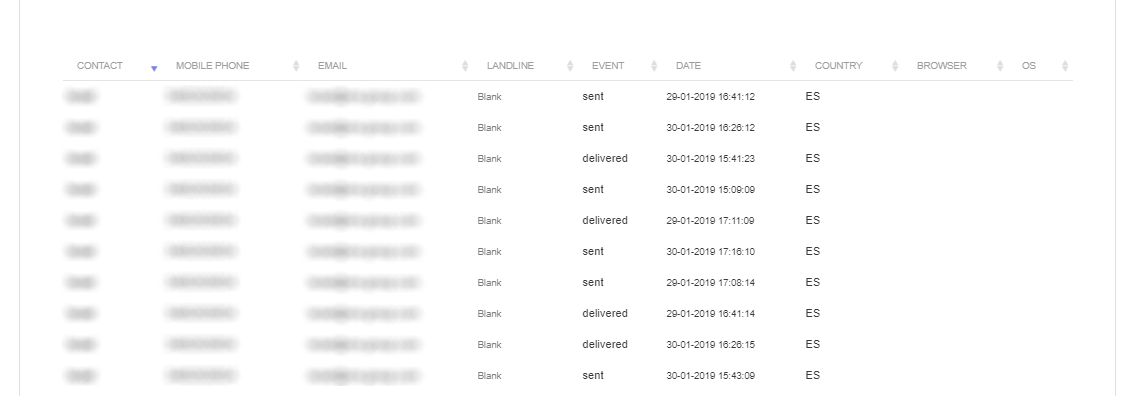
Illustration 38 - Sending statistics
To see the certified sms you must go to the {{NAME}} SMS menu within the AppExchange and go to the Sms Certified section.
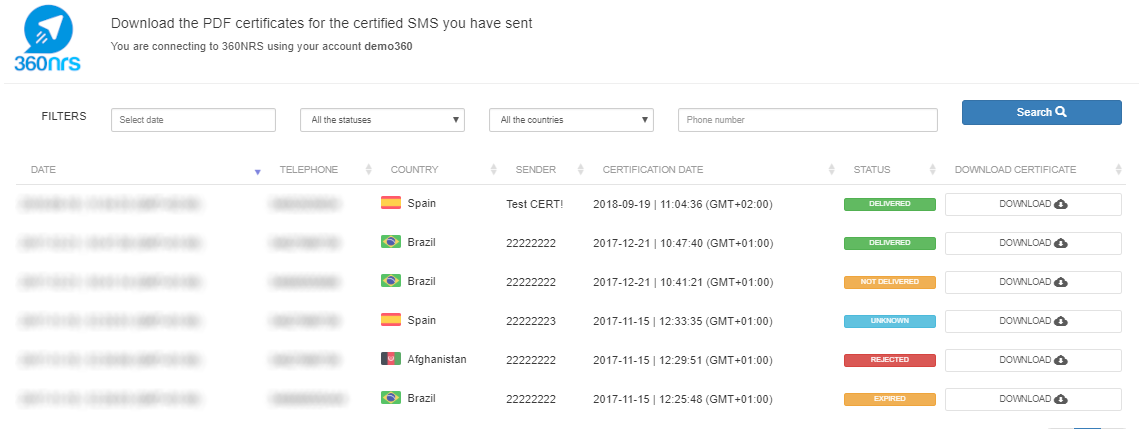
Illustration 39 - Certified SMS
To see the settings you must go to the {{NAME}} SMS menu within the AppExchange and go to the Settings section.
If you need to read from any of your Data Extension or to notify the status of the SMS in any of your Data Extension, it is necessary to introduce he following data in the Settings section: Client id, Client secret, Auth URL and Rest URL.
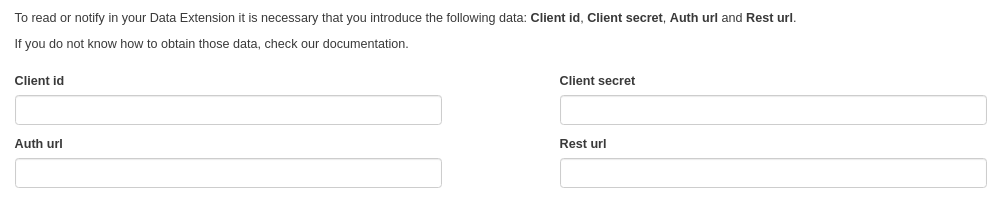
Illustration 40 - Client id, Client secret, Auth URL and Rest URL
To obtain those data you should go to the Setup section from Marketing Cloud from the upper right section of the screen:
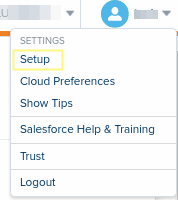
Illustration 41 - Configuration
After that, inside the Apps > Installed Packages of the left side menu you will be able to see the packages installed:
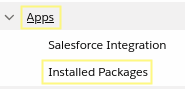
Illustration 42 - Installed packages

Illustration 43 - Installed packages
Pressing on the 360nrs package, you will be able to see the Client id, Client secret, Auth url and Rest url.
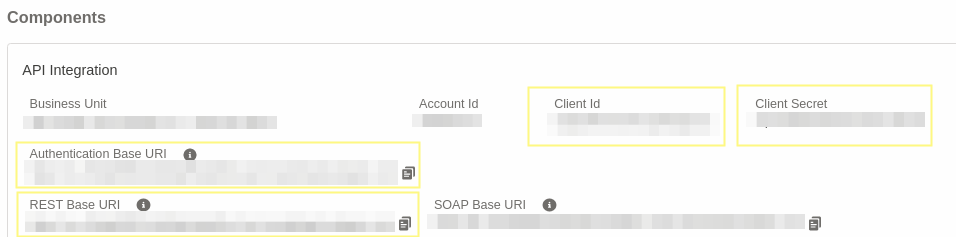
Illustration 44 - Installed packages
Once you have these data, you can introduce them in the section Settings inside the AppExchange > {{NAME}} SMS:
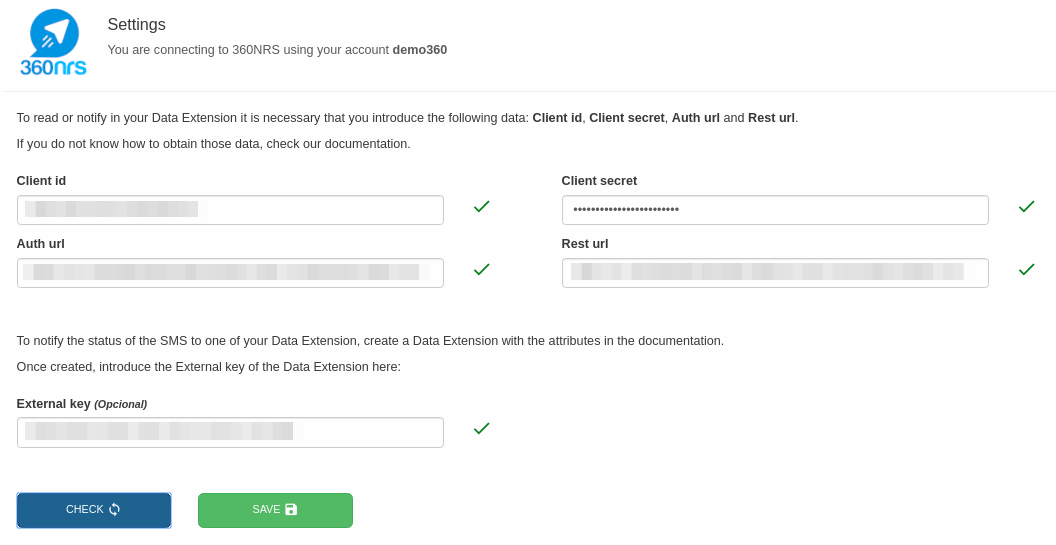
Illustration 45 - Settings
It is possible to set the expiry hour. If it is set, the expiry date will be filled in the wizard with today's date and the hour you set here.
If in addition, you want to write in one of your Data Extension the status of the SMS delivery notifications, you have to introduce the External Key of the Data Extension where you want to write them.
Once introduced the data press the button CHECK and if all are correct, press the button SAVE.
In order to write the notifications correctly, your Data Extension should have at least the following attributes: id, campaign, sender, phone, status, date, dateDlr, external, tags and message.
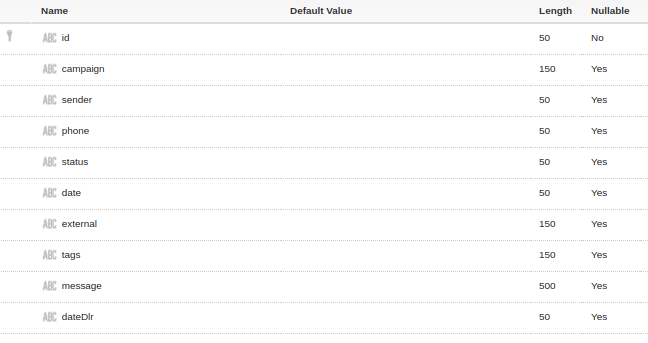
Illustration 46 - Data Extension
basic character set| 0x00 | 0x10 | 0x20 | 0x30 | 0x40 | 0x50 | 0x60 | 0x70 | |
| 0x00 | @ | Δ | SP | 0 | ¡ | P | ¿ | p |
| 0x01 | £ | _ | ! | 1 | A | Q | a | q |
| 0x02 | $ | Φ | " | 2 | B | R | b | r |
| 0x03 | ¥ | Γ | # | 3 | C | S | c | s |
| 0x04 | è | Λ | ¤ | 4 | D | T | d | t |
| 0x05 | é | Ω | % | 5 | E | U | e | u |
| 0x06 | ù | Π | & | 6 | F | V | f | v |
| 0x07 | ì | Ψ | ' | 7 | G | W | g | w |
| 0x08 | ò | Σ | ( | 8 | H | X | h | x |
| 0x09 | Ç | Θ | ) | 9 | I | Y | i | y |
| 0x0A | LF | Ξ | * | : | J | Z | j | z |
| 0x0B | Ø | ESC | + | ; | K | Ä | k | ä |
| 0x0C | ø | Æ | , | < | L | Ö | l | ö |
| 0x0D | CR | æ | - | = | M | Ñ | m | ñ |
| 0x0E | Å | ß | . | > | N | Ü | n | ü |
| 0x0F | å | É | / | ? | O | § | o | à |
* Special characters
extended character set| 0x00 | 0x10 | 0x20 | 0x30 | 0x40 | 0x50 | 0x60 | 0x70 | |
| 0x00 | | | |||||||
| 0x01 | ||||||||
| 0x02 | ||||||||
| 0x03 | ||||||||
| 0x04 | ^ | |||||||
| 0x05 | € | |||||||
| 0x06 | ||||||||
| 0x07 | ||||||||
| 0x08 | { | |||||||
| 0x09 | } | |||||||
| 0x0A | FF | |||||||
| 0x0B | SS2 | |||||||
| 0x0C | [ | |||||||
| 0x0D | CR2 | ~ | ||||||
| 0x0E | ] | |||||||
| 0x0F | \ |
* Special characters
basic character set| 0x00 | 0x10 | 0x20 | 0x30 | 0x40 | 0x50 | 0x60 | 0x70 | |
| 0x00 | @ | Δ | SP | 0 | Í | P | ~ | p |
| 0x01 | £ | _ | ! | 1 | A | Q | a | q |
| 0x02 | $ | ª | " | 2 | B | R | b | r |
| 0x03 | ¥ | Ç | # | 3 | C | S | c | s |
| 0x04 | ê | À | º | 4 | D | T | d | t |
| 0x05 | é | ∞ | % | 5 | E | U | e | u |
| 0x06 | ú | ^ | & | 6 | F | V | f | v |
| 0x07 | í | \ | ' | 7 | G | W | g | w |
| 0x08 | ó | € | ( | 8 | H | X | h | x |
| 0x09 | ç | Ó | ) | 9 | I | Y | i | y |
| 0x0A | LF | | | * | : | J | Z | j | z |
| 0x0B | Ô | ESC | + | ; | K | Ã | k | ã |
| 0x0C | ô | Â | , | < | L | Õ | l | õ |
| 0x0D | CR | â | - | = | M | Ú | m | ` |
| 0x0E | Á | Ê | . | > | N | Ü | n | ü |
| 0x0F | á | É | / | ? | O | § | o | à |
* Special characters
** Characters different from GSM
extended character set| 0x00 | 0x10 | 0x20 | 0x30 | 0x40 | 0x50 | 0x60 | 0x70 | |
| 0x00 | | | |||||||
| 0x01 | À | Â | ||||||
| 0x02 | Φ | |||||||
| 0x03 | Γ | |||||||
| 0x04 | ^ | |||||||
| 0x05 | ê | Ω | Ú | € | ú | |||
| 0x06 | Π | |||||||
| 0x07 | Ψ | |||||||
| 0x08 | Σ | { | ||||||
| 0x09 | ç | Θ | } | Í | í | |||
| 0x0A | FF | |||||||
| 0x0B | Ô | SS2 | Ã | ã | ||||
| 0x0C | ô | [ | Õ | õ | ||||
| 0x0D | CR2 | ~ | ||||||
| 0x0E | Á | ] | ||||||
| 0x0F | á | Ê | \ | Ó | ó | â |
* Special characters
** Characters different from GSM
Many countries have regulations designed to protect users from unwanted communications, both via SMS and voice calls. To ensure your campaigns reach their destination correctly and avoid blocks or penalties, it is essential to adhere to these rules.
Each country defines its own conditions and restrictions regarding commercial communications, so it is important to understand and respect the specifics of each. It is important to keep in mind that these conditions and restrictions are subject to the current legislation of each country and may change. {{NAME}} is not responsible for non-compliance with these policies; the responsibility lies with the client.
Below, you will find the restrictions for the main countries so you can operate safely and effectively. If you have any questions or if the recipient country is not listed below, we recommend contacting our customer service team.
Commercial or promotional SMS messages sent to France must comply with certain legal regulations, which are described below. Transactional messages, however, are not subject to these restrictions.
Sending messages related to politics, religion, gambling, or unsolicited promotions is strictly prohibited.
Marketing SMS messages can only be sent Monday through Saturday, between 8:00 AM and 10:00 PM. Any messages sent outside of these hours will be automatically blocked and scheduled for resending at the next permitted time. That is, if you try to send an SMS on Sunday at 2:00 PM, it won't be sent until Monday at 8:00 AM.
Contact {{SUPPORT_EMAIL}} for more information and to validate your sender.
It is mandatory to add the STOP au [STOP_CODE] as an opt-out instruction at the end of your marketing SMS messages to France.
SMS messages sent to Spain have certain legal conditions. Any SMS identified as marketing content will be subject to the conditions listed in the sections below.
Sending messages related to political or religious topics, gambling, or unsolicited promotions is strictly prohibited.
SMS messages sent to the United Kingdom are limited to certain regulatory conditions. Any SMS messages identified as marketing content will be subject to the conditions listed below.
Sending messages related to political or religious themes or unsolicited promotions is strictly prohibited.
If you send adult or gambling content, you must ensure that the recipient's age has been verified in compliance with PSA and Ofcom Guidelines.
Commercial or promotional SMS messages sent to the United States must comply with certain legal regulations, which are described below. Transactional messages, however, are not subject to these restrictions.
The use of public URL shorteners, such as bit.ly or tinyurl, is not permitted. However, the use of custom domains within these services is permitted. Therefore, you may use {{NAME}}'s own URL shortener.
In addition, sending messages containing sexually explicit or pornographic content, abusive or harassing material, information related to firearms, including fireworks, or references to alcohol, tobacco, or illegal drugs is strictly prohibited. Sending messages about gambling, investment opportunities, the repeated sending or receiving of one-time access codes (OTPs) on behalf of other providers, activities considered high financial risk, loans or loan forgiveness, credit repair services, debt collection, or tax-related matters is also prohibited. Likewise, content linked to cryptocurrency, including those related to OTPs, unsolicited real estate inquiries such as WeBuyHomes, or promotions associated with multi-level marketing is not permitted.
Contact {{SUPPORT_EMAIL}} for more information and to validate your sender.
Marketing SMS messages can only be sent Monday through Friday, between 7:00 AM and 7:00 PM, and Saturdays from 8:00 AM to 3:00 PM. Sending promotional messages is not permitted on Sundays and public holidays. Any messages sent outside of these hours will be automatically blocked and scheduled for forwarding at the next permitted time. This means that if you attempt to send an SMS on Sunday at 2:00 PM, it will not be sent until Monday at 8:00 AM.
Promotional SMS content may, in some cases, require prior registration before sending. Additionally, the {{NAME}} platform may automatically add the sender's name to the beginning of the message or include a URL at the end, depending on the channel's or destination country's conditions.
Sending messages related to political or religious topics, gambling, or unsolicited promotions is strictly prohibited.
Before sending any marketing traffic, the express consent (opt-in) of mobile device users is required.
Sending messages related to politics, religion, gambling, or unsolicited promotions is strictly prohibited.
Contact {{SUPPORT_EMAIL}} for more information and to validate your sender.
 HubSpot
 Zapier
 Salesmanago
 Klaviyo
 360nrs APIs
